Tuesday, December 21, 2010

Spicy Prawn Coconut Roast

Prawns always come in handy when you want to make something quick and easy, especially when you get it cleaned and packed in a bag! I love the prawns with the tail on, as it adds more taste to the curry/dish you make. I was trying to cook up something different with prawns and was thinking about different ingredients that should go into it. The one thing I knew for sure that needs to be in was coconut. I love how the taste of prawns gets enhanced by the flavor of coconut. So here I am with my new trial which really turned out great, that I have already made it a couple of times now!


Serves 5 people

Prawns- 1 lb (I used Tail on Prawns)
Shredded Coconut- 1 1/2 cups
Small Onions - 20 no:s
Chilly Powder- 1 1/2 tbsp
Coriander Powder- 1 1/2 tsp
Turmeric Powder- 1/2 tsp
Oil- 2 tbsp
Ginger- 30 gms (10 oz.)
Garlic- 30 gms (10 oz.)
Water- 1 1/4 cup
Salt- to taste
Curry Leaves- 2 twigs

  1. Dry roast the shredded coconut until it is reduced to half (around 3/4 cups) and is slightly brown in color.
  2. Add the small onions and a twig of curry leaves and roast for 5-6 minutes in a medium flame.
  3. Add the chilly powder, coriander powder and turmeric powder to the coconut and roast again for 4-5 minutes in a low medium flame.
  4. Keep aside the roasted coconut to cool down.
  5. Coarsely grind the roasted coconut in a mixer. No water is needed. 
  6. Smash the ginger and garlic using a mortar and pestle or mixer to a coarse paste.
  7. Heat oil in a pan and add the smashed ginger and garlic; saute until the raw smell is gone.
  8. Add the prawns to the pan and mix well with the ginger and garlic paste.
  9. Add the coarsely ground coconut to the prawns and mix well.
  10. Add water and salt to this and mix well again.
  11. Allow the prawns to cook and keep stirring in between.
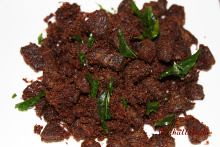
  12. When the water is almost reduced, add the remaining curry leaves and keep stirring the prawn continuously, until it is dried up and is in the roasted form.

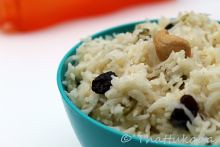
If you are a fan of prawns and love coconut, I am sure you will love this dish. This will go well with all different rice varieties including plain rice and also with rotis, appam or parotta.

Saturday, December 18, 2010

A Give Away and an Upcoming Review

And the winner is Sarah Naveen of Vazhayila! Congrats Sarah!

It has been over a year since I have been "actively" blogging. When I say "actively", I mean at least 3-4 posts a month. I had started this blog in mid 2008 and did 2 posts during that year and then went into a long hibernation mode for a year and half. I started back up again in late 2009 hoping to get some momentum going and I should say I was successful so far, at least in my terms. It was mostly due to the support from all my fellow bloggers, my readers out there and of course, my family! In this one year, I gained a lot of good friends, got blogger awards and recognitions from my fellow bloggers and also got selected as a Preferred Blogger by CSN stores. In addition to trying and posting recipes, I also did some reviews and have more coming. Keep looking in this space for an upcoming review to see my new toy from CSN! It could be anything from leather messenger bags to a cooking gadget!

So for this one successful year and for all the support that you guys have given me, I have decided to do a small giveaway! I bought a copy of "Cooking Yourself  Thin Faster" for the giveaway. This book has around 75 recipes that you can make in a flash and still be on your diet, without sacrificing the foods you love! Most recipes in this book would be familiar to most of you, but with much scaled down calories. It has recipes for Breakfast, Starters, Main Course, Sides/Soups/Salads and Desserts with great pictures.  I have started trying some guilt-free desserts from the book already and they have turned out great - not at all compromising on the taste! Please note that this is not a sponsored giveaway. Here are some pictures of the book for you to take a sneak peak:


Getting on to the rules for the giveaway:
  1. The contest is only open to US, Canadian and Indian Residents. For all others, if you have a friend/relative in US, Canada or India, you could always get it shipped to them.
  2. The contest closes on December 31 at 11:59pm PST. Winner would be announced in this blog on January 1st.
  3. The winner will be selected using random.org and will be notified via email. Please post your email id as well, if you are not a registered blogger. In the event that winner does not respond back within 3 days after they receive the email, a new winner would be chosen.
  4. You could leave a separate comment for each one of the below activity:
    1. Follow Thattukada publicly via Google friend connect and leave a comment under this post saying so. If you are already a follower, just comment so. (Mandatory)
    2. Share this post on your facebook and leave a comment about it under this post. (optional for additional entries)
    3. Tweet about this giveaway and comment here. (optional for additional entries)
    4. Post about this giveaway in your blog and comment here. (optional for additional entries)
So you could leave a maximum of 4 comments and quadruple your chances to be the winner.

So what are you waiting for! Keep the entries flowing in and Good Luck to you all!

Wednesday, December 15, 2010

Blueberry Coffee Cake Muffins

Muffins are like cupcakes, except that they are a little bigger and it is a widely accepted breakfast item in this part of the world (US). Also cupcakes normally come with frosting and muffins do not. When I think muffins, I think of blueberries, may be because I love blueberry muffins. I feel that muffins are at its best with blueberries; somehow I have a feeling that my 4 year old son believes so too. This recipe is from Ina Garten's book Barefoot Contessa Family Style. Even though it is called Coffee Cake muffins, coffee is not an ingredient; may be they call it so as it is eaten with/or intended to be eaten with coffee at the breakfast table.


Makes 18 muffins

Unsalted Butter- 1 1/2 sticks (12 tbsp) at room temperature
Sugar- 1 1/2 cups
Extra Large Eggs- 3
Pure Vanilla Extract- 1 1/2 tsp
Sour Cream- 1 cup
Milk- 1/4 cup
All Purpose Flour- 2 1/2 cups
Baking Powder- 2 tsp
Baking Soda- 1/2 tsp
Salt- 1/2 tsp
Blueberry- 2 cups

  1. Cream the butter and sugar until light and fluffy for about 5 minutes using an electric mixer.
  2. With the mixer at low speed, add one egg at a time to the butter-sugar mixture.
  3. Add in vanilla, sour cream and milk to the batter and blend well.
  4. In a separate bowl, sift together the flour, baking powder, baking soda, and salt.
  5. With the mixer at low speed, add the flour mixture to the batter and beat until just mixed.
  6. Fold in the blueberries using a spatula and mix it slowly and uniformly into the batter.
  7. Preheat the oven at 350 degree F.
  8. Line the muffin tray with paper liners and scoop the batter into the paper liners in the muffin pan, filling each cup just over the top.
  9. Bake for 30 minutes until top of the muffins are lightly browned and a cake tester comes out clean.

A tip from the book to scoop equal quantity of batter for the muffins was to use an ice cream scoop and to grease the top of the muffin pans to make it easier to take the muffins out. Both the tips worked out well for me.


This is a must-try bakery style muffin which would be a sure hit among the kids. My son liked it so much that he was not happy about me taking a few to office for my friends.

Tuesday, December 7, 2010

Easy Indian Fish Fry

For me and my family (and for most people from South Kerala, I would think), a normal lunch consists of rice, a curry (could be a vegetarian curry like Sambhar, Moru Curry, etc or a non-veg curry like a Fish Curry), a thoran (stir-fried veggies) and a fish fry. Adding fish to your daily diet ensures that you get your daily dose of omega-3 fatty acids which helps reduce the risk of heart disease and promotes healthy brain function. In addition to all these health benefits, it just makes the lunch, or any meal, all the more exciting. The version of fish fry I have here is a simple 'n easy 'n quick one, to the extent that I do not even know if a posting for the same is needed in this space here. I am just going to go ahead and do it anyways!


Makes 18 square pieces

Fish- 1 lbs (I used Mahi Mahi)
Chilly Powder- 2 tsp
Turmeric Powder- 1/2 tsp
Salt- 3/4 tsp (add according to taste) 
Oil- as needed to fry
  1. Cut the fish into square pieces.
  2. Add the chilly powder, turmeric powder and salt to the fish and mix well with your hands. Do not add any water, as the water content in the fish should be enough.
  3. Keep the fish aside for a minimum of 30 minutes to marinate.
  4. You could shallow fry this fish with very little oil or deep fry with more oil. You also have the option of baking, by broiling the fish in a conventional oven for 10 minutes.

Enjoy the fried fish with a meal or even as an appetizer. When serving as an appetizer, you could add on some sliced onions and lemon on the side.

Tuesday, November 30, 2010

Parippu Vada / Lentil Fritters

It is getting colder and colder in this part of the world. These are the times when you feel like having some of those comfort snacks like Parippu Vada (Lentil Fritters), Ulli Vada (Onion Fritters), etc with a cup of steaming hot tea. I still remember those old days when we used to wait for the lady who used to bring parippu vada most every evening to sell at our place. We used to wait for her, so we can have the tea with the vadas. Now that I do not have the luxury of sitting and waiting for the lady who sells Parippu vada, I had to dig into my bookmarked recipe from Mishmash to make the vadas myself.  


Makes 20-22 vadas

Toor Dal- 1 cup
Small Onions/Shallots- 3/4 cup (chopped)
Ginger- 1/8 cup (thinly chopped)
Green Chilly- 1/8 cup (thinly chopped)
Curry Leaves- 2 twigs (chopped)
Salt- to taste
Oil- as needed to deep fry


  1. Soak the dal for at least an hour.
  2. In a grinder, quickly grind the dal into a very coarse paste and transfer to a bowl.
  3. Add in the chopped small onions, ginger, green chilly, curry leaves and salt to the dal and mix well.
  4. Check to see if you can make a small gooseberry size ball out of the dough and flatten it slightly with your palm. If you think the dough is not sticking together, it could be because the dough is too course. If this is the case, take half of the dough and mix it again in the grinder to a slightly less coarse texture. Mix this with the rest of the dough to create cohesiveness for the dough to stick together.
  5. Heat oil in a deep frying pan in medium flame. Test if the oil is hot by dropping a tiny bit of the dough and see if it comes to the top with oil bubbling around.
  6. When the oil is hot, start making the balls out of the dough, flattening it with your palms and fry it in the oil.
  7. Fry in a medium flame so that the inside is cooked well while the outside is crispy.


Serve your Parippu Vadas with a steaming hot cup of tea or coffee. What could be better than this on a cold and freezing wintry evening. Thanks Shn for sharing the recipe!

Sunday, November 21, 2010

Goan Beef Curry

I was on my search for a "different" beef preparation when I landed upon this Goan Beef Curry. The main thing I was looking for in the recipe was some unusual ingredient. We love beef big time and always make the Kerala style nadan beef recipes and hence was looking for a change this time. My search ended when I saw this Goan Beef Curry recipe in Lakshmi Nair's Cook Book - Pachaka Kala. The ingredients that made me try this recipe was fenugreek and mustard powder, that is unusual in a beef curry, at least for me. It was definitely worth the attempt!

On a different note, I am searching in CSN stores to pick up a Christmas gift for myself and my kitchen. As most of you know, you would be surprised with the array of their offerings which ranges from extra tall bar stools to great cookware which would be hard to find anywhere else. Now lets get on to the recipe!


Serves around 10 people
Oil- 5 tbsp
Onion- 2.5 lbs (2 big - thinly sliced)
Garlic- 18 pods 
Chilly Powder- 2 tbsp + 1tsp
Coriander Powder- 3 tbsp
Cumin Powder- 1.5 tsp
Mustard seeds- 1.5 tsp
Fenugreek Powder- 1.5 tsp
Turmeric Powder- 1.5 tsp
White Vinegar- 6 tbsp
Water- 4 tbsp
Thick Coconut Milk- 1.5 cup
Beef- 3.5 lbs
Salt- to taste


  1. Crush the garlic using a mortar and pestle into a coarse paste.
  2. Heat oil in a pressure cooker and saute the crushed garlic for a minute.
  3. Add the thinly sliced onions and continue to saute until they turn transparent.
  4. In the mean time, using a mortar and pestle or a mixer, grind the mustard seeds adding a little vinegar. You could also use mustard powder instead.
  5. When the mustard is finely ground, add the chilly powder, coriander powder, cumin powder, fenugreek powder and turmeric powder and mix well with the remaining vinegar and water to make a fine paste.
  6. Add this paste to the cooker and saute until all the water is gone and oil starts to ooze out.
  7. Add the beef and salt to the cooker and cook for around 3 whistles or until the beef is cooked. Turn off the stove when the beef is done. No need to add any water, as there will be water coming from the beef.
  8. When the pressure is released, open the cooker and turn on the stove again.
  9. Add the coconut milk to gravy and mix well.
  10. When the mixture starts to boil, turn off the stove and the beef curry would be ready to serve.


So if you are looking for a different beef curry recipe, this is definitely worth a try. The fenugreek together with the mustard paste gives the curry a unique taste and flavor.

Today I aslo happened to see the event at Chacko's Kitchen The 30 best recipes of 2010 and decided to give it a shot. I have sent across the Kinnathappam and Coconut Rice recipe to the event. Wish me luck!

Sunday, November 7, 2010

Meen Vevichathu / Kudampuli etta Meen Curry / Spicy Fish Curry

Each region in Kerala has its own version of Fish Curry with its own unique flavor. The version here is the Kottayam Style Spicy Fish Curry which uses Kudampuli (Coccum), where as if you go to the Trivandrum side you would find fish curries that uses Vaalan puli (Tamarind). The Fish Curry here is also referred to as the Toddy Shop Fish Curry (Shappile Meen Curry) as it is the kind served in the toddy shops in Kerala. The taste of this curry is enhanced when served the next day. It would be ideal to use a 'manchatti' (Earthen pot) which also adds to the taste of the curry.


Serves 8-10 people
Coconut Oil- 3 tbsp
Mustard seeds- 1/2 tsp
Curry Leaves- 2 twigs
Fish- 1 lbs (I used Tilapia; Any kind of fish is fine)
Shallots - 1/2 lbs
Ginger Garlic Paste- 2 tbsp
Coccum- 4 pieces
Water- 2 1/4 cup + 7 tbsp
Kashmiri Chilly Powder- 3 tbsp
Turmeric Powder- 1/2 tsp
Coriander Powder- 1 tbsp
Fenugreek Powder- 1/2 tsp
Salt- to taste

  1. Add the coccum pieces to a cup of water and keep aside.
  2. In a mixer, grind the shallots with no or little water. You do not have to make it a fine paste.
  3. Mix Kashmiri Chilly Powder, Turmeric Powder, Coriander Powder and Fenugreek Powder with 7 tbsp of water and keep the powder paste aside. This is a spicy curry; adjust the chilly powder as it suits your taste.
  4. In a pan or earthen pot, heat the coconut oil.
  5. When the oil is hot, splutter the mustard seeds and 1 twig of curry leaves.
  6. Add the ground shallots to the oil and saute until all water is evaporated and it starts to become a light brown color.
  7. Add the ginger garlic paste and saute again until the raw smell is gone.
  8. Add the powder paste to pan and saute again until all the water is gone and oil starts to ooze out. This could take 7-10 minutes in a medium flame.
  9. Now add the Coccum with the water and add the remaining water as well.
  10. Add salt to taste and let it boil.
  11. Add the fish pieces and swirl the pan itself so that the fish is immersed in the curry. Do not use a spoon to mix from this point, as it will break the fish pieces.
  12. When the curry starts to boil, turn off the stove and close the pan with a lid and keep aside for 10-15 minutes.
  13. Garnish with remaining Curry leaves and serve.


As mentioned earlier, if made ahead the taste is enhanced. This goes well with Mashed Tapioca (Kappa) and  Rice. 

Thursday, October 21, 2010

Trifle Pudding

Trifle pudding is a quick and easy dessert that can be served for any occasion. The ingredients of a trifle pudding are arranged in layers and is normally served in a glass bowl which shows off the distinct layers which could be of different colors. The layers that make up this pudding are normally cake, fruits, jello, whipped cream, custard or ice cream. You could use ingredients based on your imagination and come up with your own unique trifle pudding. With the different textures of the various layers in the pudding and the tasty ingredients that go into its making, it is a "never-fail" recipe for a dessert. The one I have here is made with mostly store bought ingredients and hence the only prep time needed is to assemble the different layers, except for making the custard.


Serves around 10-12 people
Butter Pound Cake- 3/4 lbs
Milk- 2 cups
Custard Powder- 3 tbsp
Sugar- 2 tbsp
Mixed Fruits- 30 oz can
Whipped Cream- 8 oz
blueberry- a few to garnish (optional)


1. Take 4-5 tbsp milk and mix with the custard powder. I used strawberry flavored custard powder to create a pink layer.
2. Boil the remaining milk in a pot and add the sugar.
3. When the milk starts to boil, add the custard mixture and keep stirring.
4. When the milk starts to thicken, turn off the stove and let it cool. The custard does not have to be very thick.
5. In an 8" x 8" pan, layer the cake pieces cut to around 1" thickness.
6. Using a fork, poke the cake all over slightly.
7. Pour the almost cool custard on top of the cake layer evenly.
8. Drain the fruits from the can to remove all the syrup. I used a can of mixed fruits cocktail. You could also use fresh fruits for better taste; if using fresh fruits use around 20oz. of chopped fruits.
9. In a bowl mix the drained fruits with the whipped cream well. I used cool whip.
10. Now layer the fruits with cream on top of the custard.
11. Cover the pan with a foil and refrigerate for 2-3 hours.
12. You could garnish with some blue berries on top and serve.


A perfect recipe when you do not want to spend a lot of time in the kitchen. You could also use a sponge cake or mix the fruits with ice cream, as a variation to this recipe.

Tuesday, October 12, 2010

Nei Choru / Ghee Rice

Nei Choru is another one of the traditional Muslim dishes made during special occasions. This was what my mom used to make during most weekends back home. It is a quick and easy dish, but that does not in any way affect its grandeur. It definitely belongs to the group of those royal dishes such as Biryani and Pulao. The flavor of the ghee and the spices makes it all the more regal. The flavor was filling up the place so much, that my son was climbing up on a bar stool to see what was cooking!


Serves 4-5 people
Basmati Rice- 1 1/2 cup
Oil- 1 tbsp
Cinnamon- 1 - 2" stick
Cloves- 3
Cardamom- 3
Onion- 1 small size (around 0.35lb - sliced)
Ginger Garlic Paste- 1 1/2 tbsp
Green Chilly- 1 big (sliced of round)
Water- 3 cups
Ghee- 2 tbsp + 1 tsp
Salt- to taste
Raisins- 1/2 a handful (optional)
Cashew nuts- 1/2 a handful (optional)

1. Soak the rice for around 30 minutes and drain it.
2. Heat oil in a pan and add cinnamon, cloves and cardamom to the oil and saute for a minute. You could use ghee instead of oil as well.
3. Add the Onions and saute until transparent.
4. Add ginger-garlic paste and saute until the raw smell is gone.
5. Add the green chillies and saute for another minute.
6. Add the water and salt and let it boil.
7. Add 2 tablespoons of ghee when the water starts to bubble.
8. Add the drained rice to the boiling water.
9. When the water is almost evaporated, turn off the stove and close the pan with a lid and let it rest for 15-30 minutes.
10. Fry the cashews and raisins in the remaining 1 tsp of ghee until the raisins are plump.
11. Garnish the ghee rice with the fried cashews and raisins. You could also fry some onions and garnish.


This aromatic ghee rice goes well with most all curries, be it Vegetarian or Non-Vegetarian. Bring in a Raita, Pappadam and pickle to the table and you are ready for a perfect feast.

Thursday, October 7, 2010

Baklava

Baklava is one of the divine desserts that I was introduced to, after coming to the US at a Greek restaurant. That first bite made me a big fan of this dessert. A number of countries have claims as being the origin place for Baklava including Greece, Turkey, Lebanon, Afghanistan, Iran and so on. It is a rich flaky pastry made with phyllo sheets filled with chopped nuts; nuts used could be almonds, walnuts, pistachios, etc sweetened with a simple sugar syrup known as 'Atyr' or 'Atir'. I have looked all over the internet for the perfect recipe and this is a combination of multiple recipes (allrecipes, dedemed, etc). It did come out great!  


Makes 20 pieces
For the Simple Syrup/Atyr
Water- 1 1/2 cup
Sugar- 1 1/2 cup
Honey- 3/4 cup
Lemon Juice- 1 tsp
Rose Water- 1 tbsp

1. Boil the water and sugar together in a pan until the sugar completely melts in.
2. Add the honey and let the mixture simmer.
3. Add the lemon juice and let it boil for 10 minutes.
4. Add in the rose water and boil for another 10 minutes.

Atyr or Simple Syrup is ready. This needs to be refrigerated before using in the baklava. I made this a day ahead and refrigerated it. It is also a perfect syrup for pancakes.


For the Baklava
Walnuts- 10 oz
Pistachio nuts- 6 oz
Cinnamon Powder - 1/2 tsp
Nutmeg Powder- 1/4 tsp
Butter- 8 oz (2 sticks)
Sugar- 2 tbsp
Phyllo Sheets- 8 oz

1. Chop the walnuts and pistachios into small pieces (you can see the size up to which the nuts need to be chopped from the picture). I used slightly salted pistachios. You could use the nuts of your choice; just use a total of 16 oz.
2. Dry roast the chopped nuts for around 5-7 minutes in a medium flame. Do not let it brown.
3. Once roasted, let it cool for 10-15 minutes.
4. To this, add sugar, cinnamon and nutmeg powder and mix well.
5. Melt the butter in a bowl.
6. Butter the baking pan generously using a brush dipped in melted butter. I used a 9" x 13" disposable aluminium foil pan.
7. Unroll the phyllo sheets carefully. You need to work quickly on these sheets, else they dry up quick. You can cut the entire roll to the length of the pan, if needed. I just folded the edges to meet the size of the pan, as and when I was placing each layer. That worked well too.
8. Butter each sheet generously and place in the pan one over the other. The numbers of layers needed is up to you. I placed 8 sheets at the bottom.
9. Now spread half of the chopped nuts evenly on top of the 8 layers of phyllo sheets.
10. Butter another 5 layers of thin phyllo sheets one at a time and place one over the other.
11. Spread the remaining nuts evenly on top of this second layer of phyllo sheets.
12. Add 7 more layers of phyllo sheets on top of this after buttering each layer. Butter the top layer as well.
13. Now carefully cut this into the required shape you need. Do not cut completely through the bottom. This will help the sugar syrup to not go to the bottom of the pan and prevent soaking the phyllo sheets.
14. Bake for 30 minutes in a 350 degree F preheated oven.
15. Pour the refrigerated simple syrup over the baked baklava immediately after taking out of the oven.
16. Serve when baklava cools down. Do not cover the baklava as it may get soggy.

Baklava should remain crisp even after all the syrup is absorbed in.Garnish with some powdered pistachios.


If you are a dessert person, I am sure you will fall in love with this. The only problem with making this is you cannot just stop at that first one. So I would suggest you make it when you have a party or share it with your friends; if you are not bothered about calories, then don't even worry - just go ahead and make it.

Sending this Baklava off to Meeta's Monthly Mingle - Taste Lebanon event hosted by Bethany of Dirty Kitchen Secrets.

Saturday, September 25, 2010

Chocolate Bundt Cake

Chocolate Cakes have a special place in everyone's heart. When I think of chocolate cakes, I think of Ambrosia (a Bakery in Trivandrum) whom I think has one of the best chocolate cakes and one of my friend's mom, who used to make awesome chocolate cakes. This is the kind of chocolate cake that is not too sweet with a coffee flavor and is best eaten with the plain vanilla ice cream. I have been looking for the perfect recipe for a long time and happened to see one in Bharathy's blog - Spicy Chilly. The picture looked awesome and decided to try it out. That was a wise decision and I have been making this for sometime now in different forms - cup cakes, round cakes, etc. 

This time I decided to try it out with the Bundt pan that I got from CSN stores as part of a review for them.  As mentioned in my prior CSN Store review, if you are looking for a specific cooking tool/gadget that you cannot find anywhere else, try CSN stores as they offer a wide range of products from twin beds to cookwares


Now moving on to the Chocolate Bundt Cake recipe, I have made very slight changes to the measurement and here is my version:

Makes a 12" Bundt Cake
All Purpose Flour (Maida)- 1 cup
Milk Powder- 1 tbsp (heaped)
Cocoa Powder- 4 tbsp (heaped)
Baking Soda- 1/2 tsp
Butter- 11 tbsp (145 gms)
Sugar- 1 cup
Egg- 4
Coffee Powder- 1 tbsp (heaped)
Yogurt- 4 tbsp
Vanilla Essence- 1 tsp
Salt- 1/4 tsp


1. Sieve the Flour, Cocoa Powder, Baking Soda, Milk Powder and Salt at least 4 times to make sure that the dry ingredients are thoroughly mixed well. I used Hershey's Cocoa powder. Avoid salt if using salted butter.
2. Beat the sugar and butter well until they become smooth.
3. Add the eggs to the butter and beat well for 2-3 minutes.
4. To this, add vanilla essence and coffee powder (make sure that you are using fine coffee powder; if they are in the crystal form, powder it before you add it) and mix well.
5. Now add the yogurt to the batter and blend well. When adding the yogurt, make sure there are no lumps.
6. Now slowly fold in the flour mixture to the batter and mix well.
7. Grease a 12" bundt pan with butter and pour in the batter.
8. Bake in a preheated oven at 350 degree F for 30-35 minutes.


This cake is best eaten with a scoop of plain vanilla ice cream - yum! It is great on its own as well! Thanks Bharathy for sharing this recipe.

Sending this to "Virtual Party - Chocolaty Dreams" Event hosted by Shabitha.

Saturday, September 18, 2010

Kinnathappam - A Traditional Dessert

Kinnathappam is another one of the Eid specials and is a traditional dessert made especially during special occasions. It is a soft, slightly wiggly but firm, all white with specks of cumin, cardamom flavored, melt in your mouth kinda dessert. The history of Kinnathappam is similar to Paalaada, with a South Tamil Nadu Origin and mostly made by Muslim population in South Tamil Nadu/Trivandrum regions. The name Kinnathappam is because it is made in a "Kinnam" meaning plate. As a kid, I used to drink the batter for the Kinnathappam as much as or even a little more than I actually ate the Kinnathappam. It is one of the best desserts ever!


Makes two 9" Plates
Sona Masoori Rice- 1 cup (or any good variety of raw rice)
Water- 2 cups
Eggs- 2
Coconut Milk- 2 cups (thick)
Salt- 1/4 tsp
Sugar- 1 cup
Cardamom- 4 pods (powdered)
Ghee- 1 tsp
Cumin Seeds- 1/2 tsp


1. Soak the rice for at least 3 hours.
2. Grind the rice into a fine paste with water as needed using a grinder. When grinding is done, add the remaining water as mentioned in the recipe. Total quantity of water used should be 2 cups.
3. Now using a muslin cloth/cheese cloth or a fine mesh strainer, strain the batter.
4. In a mixer beat the eggs, sugar, salt and coconut milk and blend everything together.
5. Add this to the rice batter together with the powdered cardamom. The consistency of the batter would be watery.
6. Heat water in a steamer and place a Steel Plate or Cake Pan in the steamer. I used a 9" cake pan, as I didn't have a steel plate, which is traditionally used.
7. When the steam starts to come, add 1/2 tsp of ghee to the pan.
8. Add 1/4 tsp of cumin to the pan, when the ghee starts to melt. Leave the pan in the steamer for a minute for the cumin to slightly coat with the ghee.
9. Take the Pan out of the steamer and pour half of the thoroughly mixed batter to the pan, filling around 1 1/4 inch height.
10. Close the pan with an aluminium foil and transfer it back to the steamer and close the steamer.
11. Let it steam for 25-30 minutes.
12. Take the pan out of the steamer and let it cool a bit. Cut into desired shapes and serve. Repeat the same with the remaining batter to make another plate of Kinnathappam.

Note:- It would be ideal to grind in a grinder than a mixie/mixer, if you want the Kinnathappam to be soft. My first attempt was using a mixer and did not come out that soft. So this time I used the grinder. If you do not have a grinder, try using cold water to grind in a mixer (that's a tip from my mom).


The taste is enhanced when Kinnathappam is served chilled. You could avoid the cumin, if you do not like its taste in a dessert.  And when making this, do not forget to taste the batter before steaming it up! You do not want to miss the taste of the batter either :-)

Update:- This recipe was featured as one of the "30 Best Recipes of 2010":

Monday, September 13, 2010

Paalaada - Yummy Rice Crepes

Paalaada is one of the specialty dishes that is made back home during Eid and other special occasions. It is as thin as a crepe paper and just melts in your mouth. Paalaada is so thin that it is folded to some special shape that makes it easy to handle. The name may be cause it is as thin as the skin that forms on heated milk which is called "Paal - Aada" in Tamil/Malayalam. Paalaada is basically a South Tamil Nadu Muslim recipe and being nearer to the border is also made by Muslims in Trivandrum area as well - that is the history that I know of.

Back home, we would not even let Mom fold that first Paalaada that comes out of the pan, as it is definitely for tasting. I still follow that tradition :-) and eat the first one that comes out sharing with my son. But the only thing is that you find it hard to stop with that first one!


Makes 40 - 45 (Serves 5-6 people)
Basmati Rice- 2 cups (or any variety of raw rice)
Water- 2-3/4 cups
Eggs- 2
Coconut Milk- 1-1/2 cup (thick)
Salt- to taste


1. Soak the rice for at least 3 hours.
2. Grind the rice into a fine paste with water as needed. Do not exceed the total quantity of water mentioned in the recipe.
3. Add eggs and coconut milk also to the mixer and blend everything together.
4. Add any remaining water to the batter. The consistency that you need is really very watery.
5. Add Salt as needed. Your batter is now ready to be prepared.
6. Heat a 10" or 12" skillet at slightly higher than medium flame.
7. When the skillet is hot, pour a ladle full of batter (a little less than 1/4 cup) into the skillet and immediately rotate the ladle to spread the batter. Watch attached video (My first attempt at the video, rather R's!).


8. Wait for 30-40 seconds until the sides of the paalaada start to come off the pan. You could either use your hands to take it out or turn the skillet upside down on an aluminium foil or a plate to take the paalaada off the skillet.
9. Paalaada is now ready to be folded in any shape you need. I have shown one method in the video or you could fold it into 4.


This goes perfect with any spicy naadan preparations like Mutton Curry, Beef Curry, Chicken Roast, or any vegetable curries. Or as mentioned in the start of the post, eat it without any curries! It is definitely a treat for your taste buds and a must try!

Wednesday, September 8, 2010

Chicken Kurma

Kurma or Korma is told to have its origin from Mughalai cuisine. It consists of a creamy sauce which is made using either milk cream, coconut milk, a paste of ground nuts or a varying combination of these. This curry is highly flavored with a mixture of spices that you cannot just keep away from it because of its aroma. Kurma is usually not very spicy, especially due to the ingredients that gets added to make it creamy. There are a lot of versions of Korma available all over and the one I have here is a Malabar Muslim version which I came across in the book "The Suriani Kitchen" by Lathika George.


Serves around 10-12 people
Oil- 2 tbsp
Onion- 2 (1 lbs - Chopped)
Ginger Paste- 1 tbsp
Garlic Paste- 2 tbsp
Tomato- 2 (0.4lbs - Chopped)
Turmeric Powder- 1 tsp
Chicken - 3 lbs
Curry Leaves- 1 twig
Salt- to taste
Water- 3 cups

For Coconut paste
Cashew- 1/2 cup (chopped)
Grated Coconut- 1 cup
Green Chilly- 5
Poppy Seed- 1 tbsp
Water- 3/4 cup

For Spice Powder
Cardamom- 4
Cloves- 5
Cinnamon- 1 - 2" stick
Fennel- 1 tsp

1. Dry roast the spices in a pan and grind to make the spice powder.
2. Make the coconut paste by grinding all the mentioned ingredients into a fine paste.
3. Heat the oil (I used coconut oil to give it that traditional Kerala taste and flavor) and saute the onions until transparent.
4. Add the ginger and garlic paste and saute until the raw smell is gone.
5. Add the tomato and turmeric powder and saute for 2-3 minutes.
6. Add the ground coconut paste and saute for 3-4 minutes.
7. Add the spice powder and mix well.
8. Add the chicken and salt and mix well to make sure that the chicken pieces are coated with the gravy.
9. Add water and let it cook in a slow fire until the chicken is done.
10. Garnish with curry leaves and serve.


This is a perfect accompaniment with Kerala Parotta, Appam and Chappathi.
Related Posts with Thumbnails