Tuesday, August 31, 2010

Inji Curry/ Inji Puli

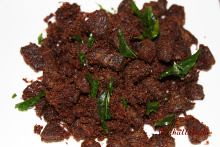
The first thing that comes to my mind when I think about Onam is Onasadya (the feast). If someone would make me sadya everyday, I would be glad to eat it on a daily basis. I love everything about the sadya, especially the Payasam round (dessert round). Another one of my sadya favorites is Inji Puli or Inji Curry. This is one of the sadya specialties that I never thought I would be able to make at home. For some reason, it always sounded complicated to me. Then I happened to see Sunitha's recipe for Inji Puli at Collaborative Curry and decided to try it out. It came out excellent. I have made very slight changes in the measurements according to my taste.


Ginger- 1 1/2 cup (thinly chopped)
Coconut Oil- 4 to 5 tbsp
Green Chilly- 9 (thinly chopped)
Red Chilly Powder- 1 1/2 tsp
Fenugreek Powder- 1/4 + 1/8 tsp
Turmeric Powder- 1/4 + 1/8 tsp
Asafoetida- 1/4 + 1/8 tsp
Tamarind Paste- 2 tbsp (used ready made pulp/concentrate)
Brown Sugar- 4 1/2  tbsp
Curry Leaves- 1 twig
Salt- 1 tsp
Water- 1 cup + 1 1/2 tbsp

1. Heat oil in a Pan and fry the chopped green chilly and ginger until slightly brown.
2. When slightly brown, take the ginger and green chilly out of the oil and let the oil drain.


3. Mix the Chilly Powder, turmeric powder, fenugreek powder and asafoetida with 1 1/2 tbsp of water.
4. In the left over oil (from frying ginger) in the pan, add the powder mix and curry leaves and keep stirring for 2 to 3 minutes in medium flame.
5. Add the tamarind paste also to the oil and mix well. You could also use normal tamarind. If using this adjust water accordingly.
6. Smash the fried Ginger-Chilly mix using a mortar and pestle a little.
7. Add this fried Ginger-Chilly mix to the pan and combine well.
8. Add the brown sugar, salt and water and let it cook and reduce to a thick consistency.


This could also be used as a pickle with Biryani or with a normal lunch. It will stay good for a couple of weeks even when not refrigerated.Thanks to Sunitha for the recipe!

Sunday, August 22, 2010

Jammers (Grand Central Bakery Jammers)

 Tomorrow being Thiruvonam, the biggest festival of the state of Kerala, let  me start by wishing all my blogger friends a Happy and Prosperous Onam.

As I have always mentioned in my posts, I am a big fan of cook books. These days flipping through baking cookbooks have become one of my favorite pass times, whether I make something out of it or not is a different question. The recipes should look really impressive and kinda easy to make, for me to come to that- "Try-it-out" mode. So this recipe here is something I came across from "The Grand Central Baking Book". This book contains some of the menu items available at the popular Grand Central Bakery; I have never been to the bakery myself, but reading this book is making me want to. So one of these days I am definitely going to  pay them a visit. The Jammers are really easy to make and a perfect addition to the breakfast menu. 


Makes 7-8 Jammers

All-purpose flour (Maida)- 2 cups
Granulated Sugar- 1 1/2 tbsp
Baking Powder- 1 tsp
Baking Soda- 1/2 tsp
Salt- 3/4 tsp
Unsalted Butter- 1/2 cup (1 stick)
Buttermilk- 1/2 cup
Jam/Preserve- 8 tbsp


1. Combine all the dry ingredients (flour, sugar, baking powder, baking soda and salt) using a whisk.
2. Cut in the butter into the flour and use your hands or a mixer at a low speed to blend the butter into the dry ingredients until the flour texture changes to mealy. You should still see dime sized pieces of butter in the flour. You could refrigerate the mixture covered with a plastic wrap at this point, if you want to prepare later.
3. Make a well in the flour mixture and add in the buttermilk. Gently mix the dough until it comes together. Do not knead too much. The end product of this step should still have visible chunks of butter and floury patches. Add additional buttermilk (a tablespoon at a time), if the dough is dry and too crumbly.
4. On a lightly floured surface roll out the dough using the heels and sides of your palm, about 1.5 to 2 inches thick. The dough will not look smooth at this point either, and that is what we want.
5. Using a biscuit cutter or a water glass cut into circles about 2  to 2.5 inches diameter. Roll out the leftover scraps and repeat cutting into circles.


 6. Using your thumb make an indentation at the center of the biscuit that goes almost to the bottom of the biscuit that is wider at the bottom. While doing this, support the outer edge of the biscuits with your fingers.
7. Fill in the indentation with a tablespoon of jam and put them 1 1/2 inches apart in a baking tray lined with a baking sheet.


8. Preheat the oven at 350 degree F and bake for 35 to 40 minutes.


The jammers taste at their best when eaten warm. It is definitely a perfect breakfast and I would  also eat it as a snack anytime.

Sunday, August 8, 2010

Rosebud Madeleines

Madeleine was on my list since long. These are very small sponge cakes with a shell like shape, which is obtained using the special madeleine molds. These are described as French butter cakes cause of their French origin and yummy buttery taste. I was looking around in most local stores in my area since sometime to find the madeleine pan, but without much success. That is when CSN stores contacted me to do a review of some of their products. I was looking at the wide variety of products that they had to offer, ranging from twin beds to cookwares to pick the perfect item for my review and guess what, I found the Madeleine pan on their cookware website. They do have a wide selection of all kinds of specialty cookware. Something definitely worth checking out!

Once I received the Madeleine pan, I started going over the 5 to 6 recipes that I had shortlisted for making madeleines. One of them was the Rosebud Madeleine recipe that was in the book "How to be a domestic Goddess" by Nigella Lawson. That sounded perfect, one of the reasons being the use of rose water which I love the flavor of.


Makes 12 Madeleines

Salted Butter- 1/4 cup + Additional for greasing
Eggs- 1 large
Sugar- 2 tbsp (level)
All purpose flour (Maida)- 1/3 cup
Rosewater- 1 tbsp
Confectioner's Sugar- for dusting (optional)


1. Melt the butter at a low heat and then leave to cool. You could also use unsalted butter (that is what the recipe actually calls for and then add a pinch of salt to the batter).
2. Beat the Egg and Sugar in a bowl for 5 minutes using an electric mixer, until it is as thick a mayonnaise.


3. Sieve in the flour into the egg-sugar mix shaking a sieve that is held above the egg-sugar mix.


4. Fold in the flour smoothly into the egg-sugar mix.
5. Add the melted butter and Rosewater and mix smoothly in.
6. Keep the batter in the refrigerator for an hour and then leave at room temperature for 30 minutes. (This is an optional step; I tried it with and without this step; did not feel much difference).
7. Preheat the oven at 425 degree F.
8. Brush the insides of the madeleine molds generously with butter.
9. Fill the molds with the batter (this would be 2+ teaspoons full for each). Do not worry about filling the indentations completely with the batter. The batter will spread as it heats up.
10. Bake for 8-10 minutes. Keep checking in between. It will be ready as the sides start to brown a bit.
11. Remove the madeleines from the pan and let it cool on a rack.


 12. You could serve by dusting confectioner's sugar. It is awesome even without dusting the sugar.

These are a perfect tea time snack and for munching anytime. It is also an easy recipe with not too many ingredients. If you do not have rosewater, you could use some other essence like vanilla. But I would suggest getting rosewater if you have an option.

Showing off my newly acquired possession from cookware.com.


Related Posts with Thumbnails